Documents
Articles in this Topic
Related Articles
Access Documents
Documents can be accessed from the following
- Recent or Pinned Documents' list in the Workspace menu on the left.
- Documents listing page accessed by selecting 'View All' from the 'Recents or Pinned Documents' list.
- Search results.
- Entity Profile from an Entity's related Documents listing.
Once a Document has been added, Entities (existing or new) can be added to the Document.
Links can be created between the Document's Entities.
Notes and Tags can be added with the option to link Notes to the Document's Entities.
Attachments can be added to the Document.

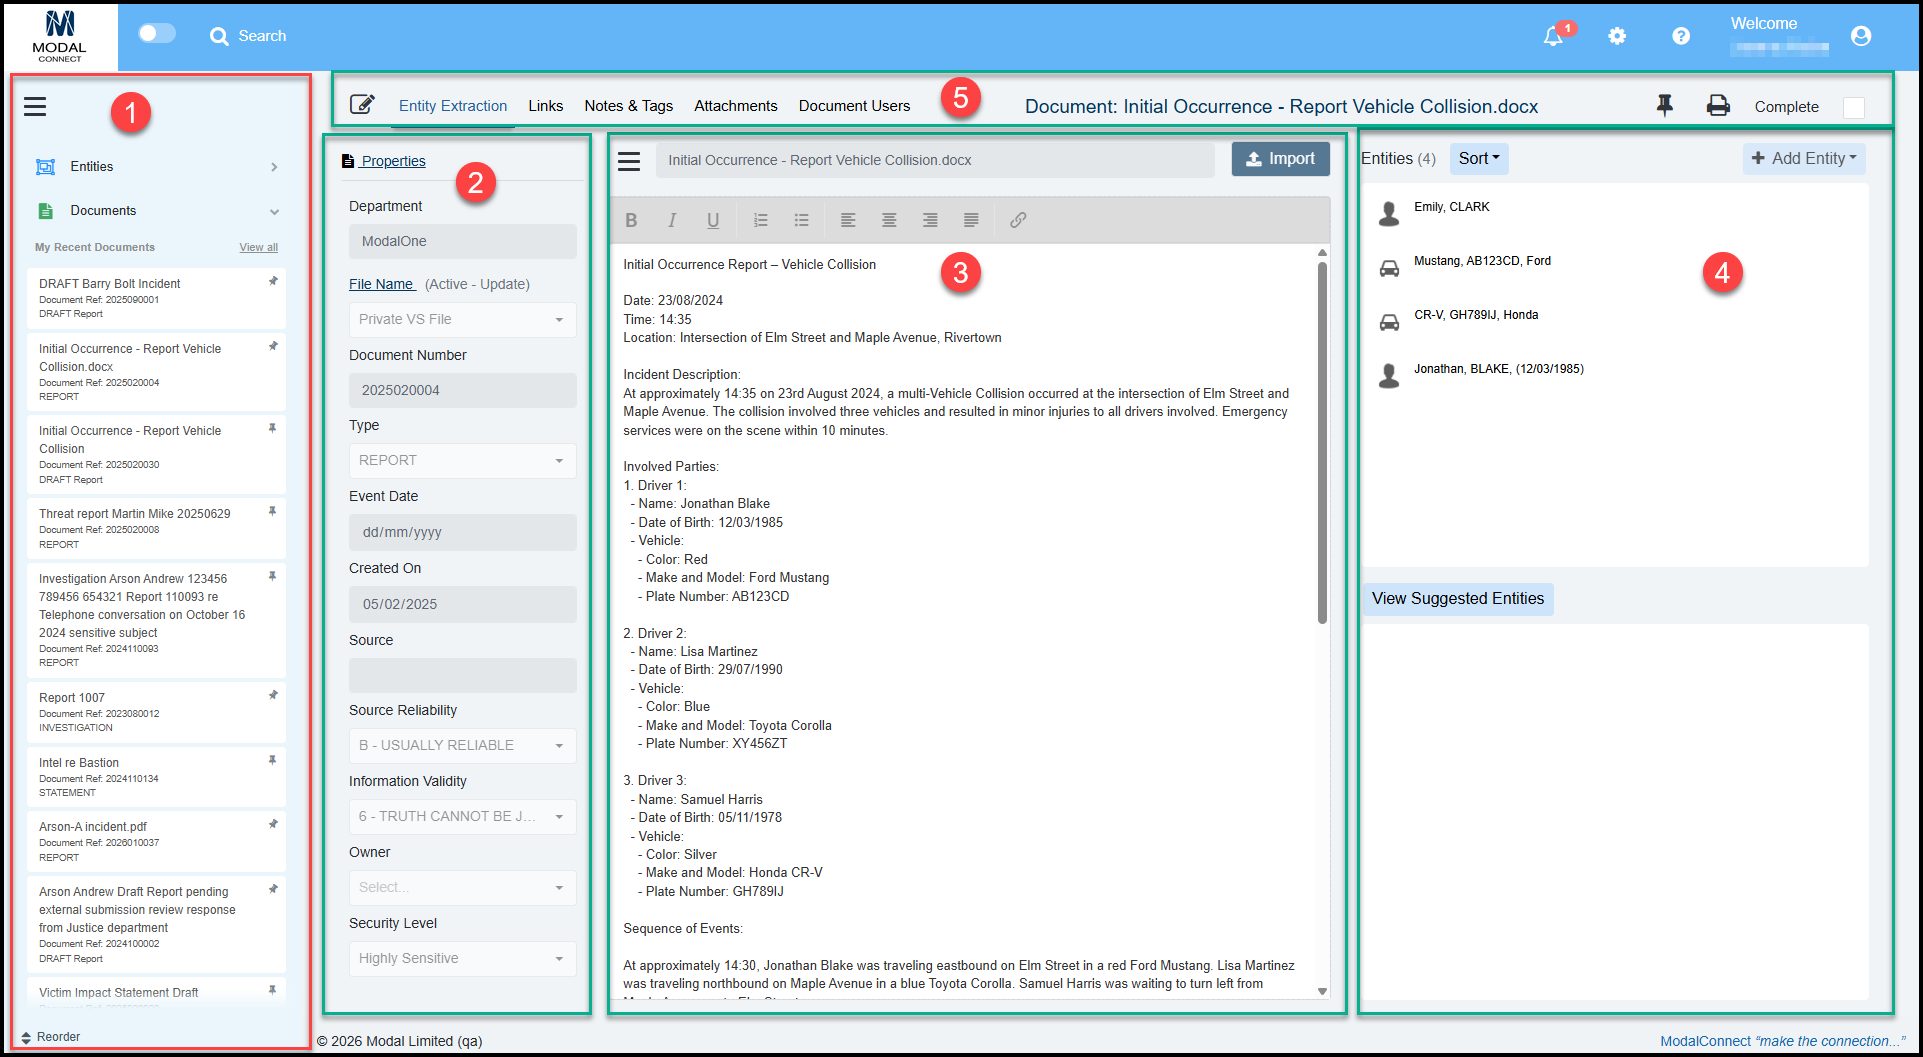
The main Document opens on the Entity Extraction page. The Workspace left menu pane can be collapsed to increase the viewing pane of the Document Content. Toggle to close.
The main Document view consists of the Document Details and Properties pane on the left, the Content pane in the middle and the Entities list pane on the right. The default view is Read-Only.
To make any Edits click the Edit button.
Document Page Layout
- Recents or Pinned Documents list in the Workspace left menu
- Document Details and Properties Pane
- Document Content & Title
- Document Entities List
- Document Pages Menu and editing buttons
Document Details & Properties
The Document Details show in the left pane and consists of the basic information recorded or captured when the Document was created:
- Department - the Department the Document was added to (not editable).
- File Name - of the File the Document was added to (can be updated to another File of the Department).
- Document Number - the unique Document number (not editable).
- Type - the Document Type (editable)
- Event Date - the date of the Event the Document pertains to (editable).
- Created date - the date that the Document was added or created (editable).
- Source - the source of the information in the Document (editable), (auto-populated when generated via a LiNK Form) .
- Source Reliability - the source's reliability rating (editable).
- Information Reliability - the reliability rating of the information in the Document (editable).
- Owner - the Owner of the Document (editable).
- Security Level - the security classification level (editable).
- The Document properties sit above the details (editable)
Edit Document Details
The Document Details (of a saved Document) can be edited except for the Department and the Document Number.
If edits have been made click the Document Save button.
Add or Edit Properties
Additional properties can be added or existing ones edited by clicking on 'Properties' at the top of the Details pane. From the Properties field select the required additional Properties and record the property detail/value. Or edit existing properties if needed.
The Properties for 'SubmittedBy, ProvidedBy and Site' are automatically captured from processed LiNK Form submissions (or can be added manually).
Note - Mandatory properties cannot be deleted so do not show the delete x but can be updated.
Click Finish to save changes and close the property pane.
The Document Details & Properties pane can be closed by clicking on the toggle (3 bars) to the left of the Document Title. This provides more space to view the Document content.
To reopen this pane click on the horizontal bars.
To navigate to the parent File the Document belongs to, click on the File Label from the details pane.
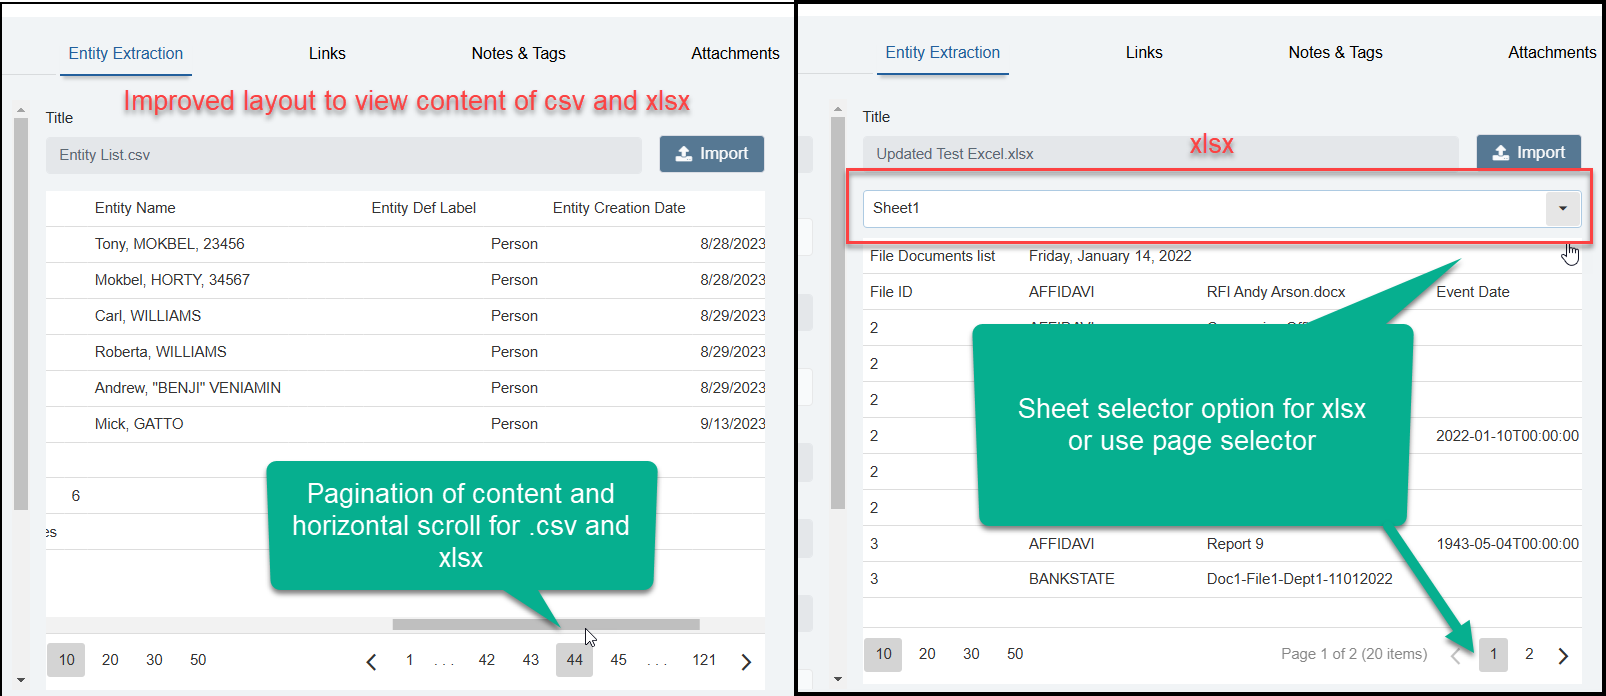
The Document Title and Content show in the middle pane. A vertical scroll bar is provided on the right and up and down buttons to facilitate viewing.
Spreadsheets - csv and xlsx have a horizontal scroll bar and pagination. For xlsx files a sheet selector is available if the file included multiple sheets. Spreadsheet content is read only and not editable (Entity extraction is enabled).
Part of the main purpose of the Content window is to enable text to be extracted to create \ add Entities - hence the page title of 'Entity Extraction'. If Entity details have been saved within an image format in the content then this will have to be manually added as text into the content to enable Entity extraction and or Suggested Entity identification as explained in this topic - Adding Entities
Note: If there is no detail showing in the Content pane other than this message "Unable to extract content of the file. Check that it represented as text (not image) and has a correct format" the source document used for the content was image based e.g a scanned document and the text content could not be extracted. The Document is saved and can be viewed on the Attachments page.
Edit Document Content or Title
To Edit the Document Title or Content click the Edit button. The Title can be edited as can the content (unless it is within an image) either directly within the existing content or the existing content can be fully replaced by importing a new document. Caution - this replaces the current content so the previous content will no longer be available. If a previous Document is replaced the replacement content is not automatically saved as an attachment as this only occurs on the initial content used.
Spreadsheet content is read only and not editable (Entity extraction is enabled).
There is an editing menu in the top of the Content pane for editing, formatting and\or adding hyperlinks.
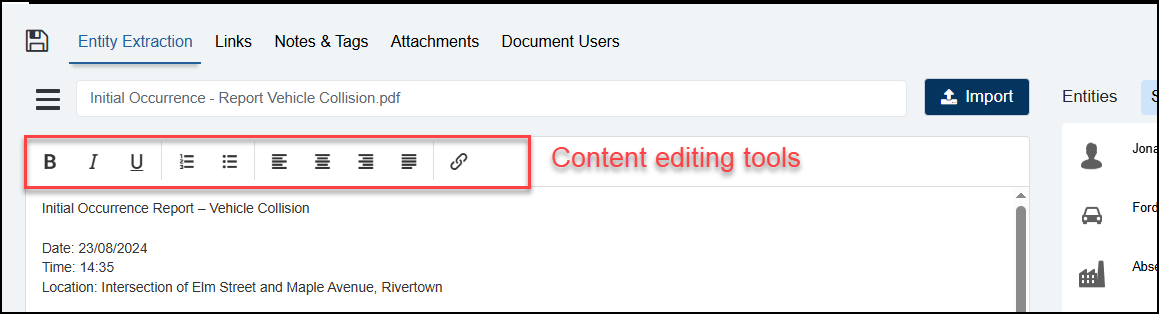
To add a Link to existing text or adding new text, click the Link icon from the editing ribbon. This opens a pop-up window, add the URL to selected text from the content or add the url as is, or add text that the link will be embedded in.

To insert an image![]() into the Content place the cursor where the image is to go and drag & drop the image.
into the Content place the cursor where the image is to go and drag & drop the image.
Save changes by clicking the Document Save button.
Find Content: Use the keyboard shortcut Ctrl+F function to find a specific word, term, character or phrase within the Document Content.
To view a Document Entity - or Suggested Entity's remembered term within the content (where/if it exists), click on the Entity listed - Document Entities are highlighted yellow and Suggested Entities are highlighted green.
Pin Document
To keep a Document in the list of "My Pinned Documents" in the 'My Recent' menu, click on the Pin so it is pointing diagonally.
To unpin a Document, click on the diagonal pin.
Mark Document as Complete
To mark a Document as completed and lock it for further editing, from the Editing Menu click into the 'Complete' checkbox on the right and confirm the action.
To remove the 'Complete' check open the Document in Edit mode and edit the Content - click into the check box and when the Document is saved the check will be removed.
Print Document
The Document can be printed by clicking on the 'Print' button on the right of the page/editing menu. This will also include the Document Title, Details, Content, Properties, a list of the Document Entities and their Links & Associations.
The Security classification detail appears at the top of the print-out and at the end.
Note: A formatting anomaly may occur where text such as the letter I is shown in bold font throughout the Document. This is due to some PDF viewer settings in the browsers (and not within ModalConnect). If this occurs, try saving the Document as a PDF first then print from the saved PDF.
Another option is to use a PDF Viewer where you can disable the 'Enhance thin lines' function like Adobe Acrobat.
As a general rule it is not necessary to add Users to Documents as access is determined by the User's Role for the related Files and Departments they have permissions to access. There is typically only 1 User showing and that is the User that created the Document (unless their User account has been disabled in the Organisation Users).
Security exemptions can be applied to either enable or deny specified Users access to the Document although this is best managed via the File permission. If the Document belongs to a private File or Department the User must be added to both the Department and the File to have full access.
Add a Security Exemption
From the Document menu select Document Users.
There will be at least 1 existing User record for the User that created the Document.
To add a Security exemption for a user, click the Add User button.
This opens the 'Add a security exemption' pane.
Select the user first then select the Security Rule to apply;
Allow - User has access to the Document and it's Entities.
Deny - User does not have access to the Document and it's Entities and cannot even see the Document Title in the Documents list.
Click Save to add the Rule and Finish to close the pane.
Clicking Cancel will close the pane with no changes made.
Remove User Rule
To remove a rule - alongside the User security record click Remove and confirm. The Rule is deleted.
The logged in user cannot remove themselves from the list of Users.

Recommended Next Topic
Watch the videos
Viewing Tips
To view a video at full screen, click on the 'Full screen' button.
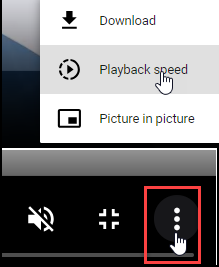
To adjust the playback speed (decrease or increase) click on the 3 dots and select Playback speed.
Captions display best if the mouse or touch-pad are not moved or engaged once playing.
Videos have no audio.

| Edit Document | Manage Document Users |